Programming Guide
- Programming a phone for internet and MMS doesn't have to be difficult! Simple Mobile provides the Over the Air (OTA) capability on the SMART portal for easy configuration. Occasionally you'll find a phone that needs to be manually configured. Just follow these step-by-step instructions to program Internet and MMS settings for a growing list of phones Simple Mobile customers like to use.

Android 4.0 & 4.1 (Ice Cream Sandwich & Jelly Bean) - Internet and MMS
Pull down the notifications screen & tap on Settings
Tap on Mobile Data (some phones say "more"
Tap Mobile Networks (some phones have "Access Point Names" here)
Tap Access Point Names
Press the menu button
Select New APN
Name:SIMPLE Mobile
APN: simple
Proxy:<Not set>
Port:<Not set>
Username:<Not set>
Password:<Not set>
Server:<Not set>
MMSC: http://10.165.193.23/mms/wapenc
MMS Proxy:<Not set>
MMS Port:<Not set>
MCC: 310
MNC: 260
APN Type: default,supl,mms,admin
If no APN settings are present, a restore to factory default settings may be required.
Select Menu and Save
Go back one screen to the APN list and tap on the dot to Enable the SIMPLE Mobile APN
Restart phone & you're set!
These settings have been tested to work with the Galaxy S3 and the HTC One S
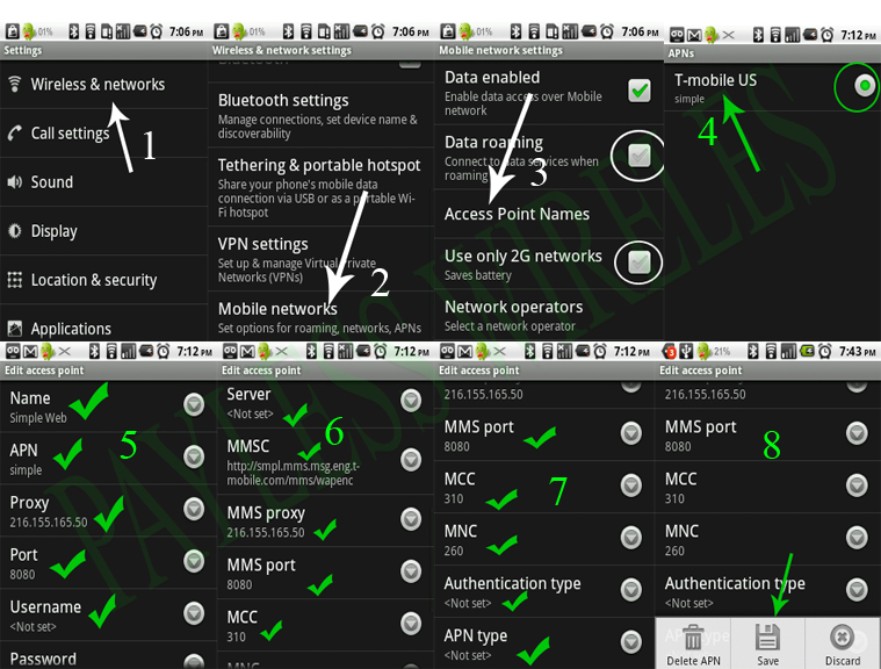
All Latest Androids (2010- Current)
Press the menu.
Tap Settings.
Tap Wireless Controls or Wireless & Networks.
Tap Mobile Networks.
Check that:
"Data Roaming" and "Use Only 2G Networks" are both unchecked
Tap Access Point Names.
Press the menu button.
Select New APN.
Name: SIMPLE Web
APN: simple
Proxy: <Not set>
Port: <Not set>
Username:<Not set>
Password:<Not set>
Server:<Not set>
MMSC:http://smpl.mms.msg.eng.t-mobile.com/mms/wapenc (or) http://10.165.193.23/mms/wapenc
MMS Proxy: <Not Set>
MMS Port: <Not Set>
MCC: 310
MNC: 260
APN Type:<Not set>
If no APN settings are present, a restore to factory default settings may be required.
Android (MY Touch, G1, MOTO Cliq & Behold 2) - Internet
- Press the menu.
- Tap Settings.
- Tap Wireless Controls or Wireless & Networks..
- Tap Mobile Networks.
- Check that:
- "Data Roaming" and "Use Only 2G Networks" are both unchecked.
- ETap Access Point Names.
- Press the menu button.
- Select New APN.
- Name: Simple Mobile
- APN: simple
- proxy: 216.155.165.50
- Port: 8080
- Username: [empty]
- Password: [empty]
- Server: [empty]
- MMSC: http://smpl.mms.msg.eng.t-mobile.com/mms/wapenc or http://10.165.193.23/mms/wapenc
- MMSProxy: [empty]
- MMS Port: [empty]
- MCC: 310
- MNC: 260
- APN Type: [Not set]
- For Samsung Behold II press #*87927#
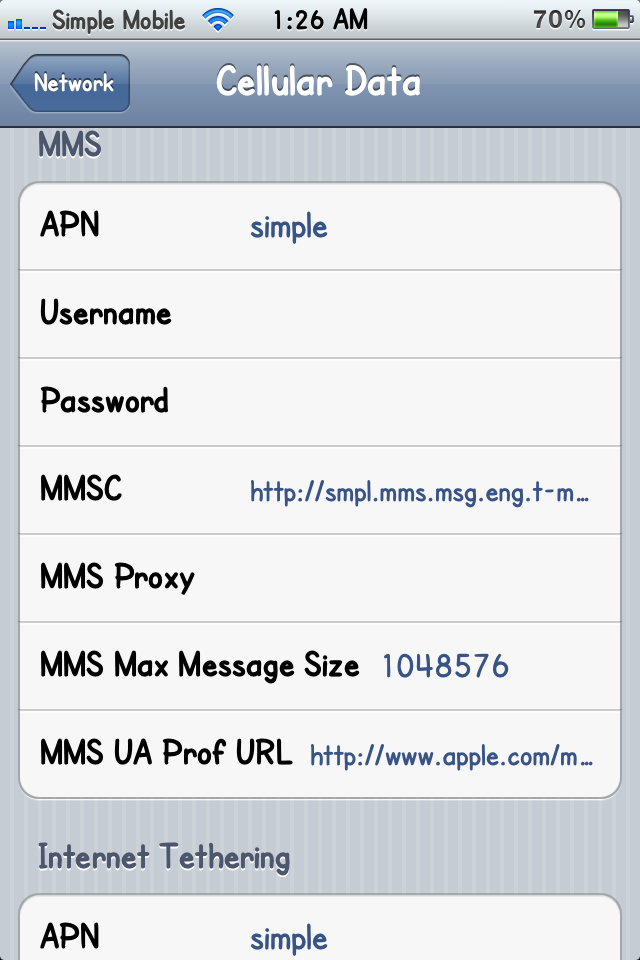
Apple iPhone - Internet and MMS
- Select Settings.
- General Settings.
- Select Network.
- Select Cellular Data Network.
- Select APN.
- APN: simple
- Username: Blank
- Password: Blank
- APN: simple
- Username: blank
- Password: blank
- MMSC: http://smpl.mms.msg.eng.t-mobile.com/mms/wapenc or http://10.165.193.23/mms/wapenc
- MMS Proxy: blank
- MMS Message Size: 1048576
- MMS UA Prof URL: http://www.apple.com/mms/uaprof.rdf
Quickfire - Internet and MMS
- Internet Part 1
- Press MENU.
- Press SETTINGS.
- Press PHONE.
- Press NETWORK PROFILE.
- Press ADD.
- Title: Simple
- Username: Blank
- Password: Blank
- APN: simple (lowercase)
- Press SAVE two times then press END CALL.
- Internet Part 2
- Tap SETTINGS.
- Tap APPS.
- Tap BROWER SETTINGS.
- Tap ADD.
- Tap ENTER NAME: Simple
- Hit DONE.
- Home: http://www.google.com/
- Hit DONE.
- Proxy Address: 0.0.0.0 or leave blank
- Port:
- Network Profiles: Select Simple and press Activate.
- Internet Part 3
- Tap MENU.
- Tap SETTINGS.
- Tap APPS.
- Tap MSG SETTINGS and then MULTIMEDIA MESSAGES.
- Tap MSG CENTER.
- Verify the following:
- Name: Simple MMS
- MMSC URL: http://smpl.mms.msg.eng.t-mobile.com/mms/wapenc or hhttp://10.165.193.23/mms/wapencttp://10.165.193.23/mms/wapenc
- MMSC Proxy:
- MMSC Port:
- Network Profile : Simple (drop down list)
LG (Generic)
Internet Setup
Select Menu.
Select Settings.
Select Connection.
Select Network Profile.
Select Network Profile.
Enter the following information:
Connection title: simple web
Auth: [None]
User name: [empty]
Password: [empty]
APN: simple
Browser Setup
Select Menu.
Select Media Net (if At&t).
Select Browser Settings.
Select Accounts.
Select Options.
Select New.
Enter the following details:
Acct Name: Simple Web
Homepage: [User Preference]
Connection Type: TCP without proxy
Security: Non-Secure
Time out: 150
Network profile: Simple Web
Click Save
Check the box next to Simple Web
MMS setup
Select Messages.
Select Message Settings.
Select MMS.
Select message Center.
Select Options.
Select New.
Enter the following information:
Name: Simple MMS
MMSC URL: http://smpl.mms.msg.eng.t-mobile.com/mms/wapenc (or) http://10.165.193.23/mms/wapenc
MMSC Proxy: 0.0.0.0
MMSC Port: 80
Connection Mode: TCP w/o Proxy
Network Profile: Simple Web
Click Save
Select Activate
LG KP500
- Internet Setup
Select Menu.
Select Settings.
Select Connection.
Select Access points.
Add profile.
Connection title enter: Simple Mobile
Bearer: GPRS
Authentication: PAP
Username: NONE
Password: NONE
APN' enter: simple
Connection title enter: Simple Mobile
Save'.
Back to Connectivity.
Internet profiles.
Add profile.
Title enter: Simple WEB
Use proxy: On
Proxy server address: 216.155.165.050
Proxy server port: 8080
Access point: Simple mobile
Save
Go to the internet.
Settings.
Profiles.
Add profile
Title: Simple
Internet profile
SimpleWEB
Save.
Activate Simple WEB.
Select Menu.
Select Settings.
Select Connectivity.
Select Internet profiles.
Add profile.
Title: Simple MMS
Use proxy: On.
216.155.165.050
Proxy server port: 8080
Access point: Simple Mobile
Multi msg center
Add center
Title: Simple MMS
MMSC URL: http://smpl.mms.msg.eng.t-mobile.com/mms/wapenc
MMS profile
Simple MMS
Save, then press "Yes" to activate.
Samsung Gravity and Most Samsung Devices - Internet and MMS Setup
Internet/WAP Setup
Enter *#87927#.
Enter the appropriate settings as shown below:
Set Name: simplemobile
Access Name: simple
Auth type: None
Protocol: HTTP
Home URL: http://www.google.com
Proxy: 0.0.0.0
Port: 0
Linger time: 300
Select Save
MMS Setup
Enter *#87667#.
Enter the appropriate settings as shown below:
Set Name: simplemms
Access Name: simple
Auth type: Secure
Protocol: HTTP
Home URL: http://smpl.mms.msg.eng.t-mobile.com/mms/wapenc
Proxy: 0.0.0.0
Port: 0
Linger time: 300
Select Save
Samsung Behold (Highlight, Memoir & Solstice) - Internet and MMS Setup
Internet
*#6984125*#
In the Admin setting.
Network & call settings.
Connections.
Network profiles menu, you will need to delete the DM Profile and the TMO_DS profile.
Name: SimpleMobile
APN or Access Point : simple
Proxy: 216.155.165.050
Home URL: http://smpl.mms.msg.eng.t-mobile.com/mms/wapenc
Port: 8080
Linger Time: 3003
Auth Type: Not Set or empty
Internet (you will need to edit the Browser Profile).
MMS (you will need to edit the MMS profile)
Name: Simple MMS
Access name: simple
Proxy: 216.155.165.050:8080
Home URL: http://smpl.mms.msg.eng.t-mobile.com/mms/wapenc
Samsung A-Series Phones - Internet and MMS Setup
- Menu.
- Settings.
- Application Settings.
- Browser Settings.
- Options.
- New.
- Set Name: Simple Web
- Access Name: simple (All Lowercase)
- Auth Type: none
- User ID: blank
- Password: blank
- Protocol: HTTP
- Home URL: http://www.google.com/
- Proxy Address: 216.155.165.050
- Port: 8080
- Linger Time: 3003
- Save
- Highlight Simple Web and Save.
- Menu.
- Settings.
- Application Settings.
- Messaging Settings.
- Multimedia Message.
- Multimedia Message Profiles.
- Options.
- New.
- Set Name: Simple MMS
- AcAuth Type: Secure
- User ID: blank
- Password: blank
- Protocol: HTTP
- Home URL: http://smpl.mms.msg.eng.t-mobile.com/mms/wapenc
- Proxy Address: 216.155.165.050
- Port: 8080
- Linger Time: 3003
- Save
- Highlight Simple MMS and Save.
Simple MMS
Samsung T-Series Phones - Internet and MMS Setup
Internet Setup
Enter *#87927#
Name: Simple Web
APN: simple
Auth Type: none
Username: blank
Password: blank
Protocol: HTTP
Home URL: http://www.google.com/
Proxy Address: 216.155.165.050
Proxy Port: 8080 (If there is no field for the port add ":8080" at the end of the proxy address)
Linger Time: 3003
Save
MMS Setup
Enter *#87927#
Select MMS.
Name : Simple MMS
APN: simple (All lowercase)
Auth Type: Secure
Username: blank
Password: blank
Protocol: HTTP
Home URL: http://smpl.mms.msg.eng.t-mobile.com/mms/wapenc
Proxy Address: 216.155.165.050
Proxy Port: 8080 (If there is no field for the port add ":8080" at the end of the proxy address)
Linger Time: 3003
Save
Alternative Internet Setup
Enter *#87927#
Select Profile Settings.
Choose an empty profile to edit the settings on, usually Profile 2.
Name : Simple Web
Home URL: http://www.google.com/
Proxy Enabled.
Auth Type: none
Username: blank
Password: blank
Protocol: HTTP
Select GPRS Settings
Proxy Address: 216.155.165.050
Proxy Port: 8080
APN or Access Point: simple (All lowercase)
Save
Save again.
Go back to the screen where it says Current Profile and Profile Settings.
Select Current Profile.
Highlight Simple Web then press save.
Alternative MMS Setup
Enter *#87667#
Select Profile Settings.
Choose an empty profile to edit the settings on, usually Profile 2.
Name : Simple MMS
Home URL: http://smpl.mms.msg.eng.t-mobile.com/mms/wapenc
Proxy Enabled.
Auth Type: Secure
Protocol: HTTP
Username: blank
Password: blank
Select GPRS Settings
Proxy Address: 216.155.165.050
Proxy Port: 8080
APN or Access Point: simple (All lowercase)
Save
Save again.
Go back to the screen where it says Current Profile and Profile Settings.
Select Current Profile.
Highlight Simple Web then press save.
Sciphone (iPhone clone) - Internet and MMS Setup
Internet Setup
- Select Menu, Services, Data Account, and then select GPRS.
- Select the first profile (China Mobile) and then select Edit.
- Enter the appropriate settings as shown below:
- Name: simpleweb
- Access Point (APN):simple
- Connection Type: http
- User Name: none
- Password: none
- Select Options and then select Done.
- Select Services, WAP, and then select Settings.
- Select Edit Profile, SIM 1, and then Edit the first profile in the list.
- Enter the appropriate settings as shown below:
- Name: simpleweb
- Homepage:http://www.google.com
- Data Account: simpleweb
- Connection Type: http
- **The following settings may not appear**
- Proxy: 0.0.0.0
- Port: 80
- User Name: none
- Password: none
MMS Setup - Select Messages and then select Message Settings.
- Select Server Profile, and then Edit the first profile in the list.
- Enter the appropriate settings as shown below:
- Name: simpleweb
- Homepage: http://smpl.mms.msg.eng.t-mobile.com/mms/wapenc
- Data Account: simpleweb
- Connection Type: http
- **The following settings may not appear**
- Proxy: 0.0.0.0
- Port: 80
- User Name: none
- Password: none
- Select Options and then select Done.
- Highlight the new profile and then select Activate.
Nokia Devices
- Generic Internet Setup
- From the main menu select Settings.
- Select Configuration settings.
- Select Personal configuration settings.
- Select Add New.
- Select Services (or Web).
- Select Account name.
- Enter Simple.
- Select OK.
- Select Homepage and enter: http://www.google.com
- Select OK twice.
- Leave the Username and Password blank.
- Select Access point settings.
- Select Proxy.
- Select Disable.
- Select OK.
- Select Proxy address.
- Enter 0.0.0.0
- Select OK.
- Select Proxy Port.
- Enter 8080 and then select OK.
- Select Data bearer.
- Select GPRS and then select OK.
- Select Bearer settings.
- Select GPRS access point.
- Enter simple as the access point and then select OK.
- Select Authentication.
- Select Normal and then select OK.
- Leave the Username and Password blank.
- Select Back twice.
- Select the Simple profile.
- Select Options.
- Select Activate Service Settings.
- Press the red End key to return to the home screen.
Nokia 5230
- Internet Setup
- Menu.
- Settings.
- Connectivity.
- Destinations.
- Internet.
- Options.
- New access point.
- Tap on No.
- Tap on Packet data.
- Tap on the Text field.
- Enter Simple Web and then tap on the Green check mark.
- Tap on OK.
- Highlight the Simple Web and then tap on Options.
- Tap on Edit.
- Tap on Access point name.
- Enter "simple" and tap on the Green check mark.
- Tap on OK.
- Tap on Homepage.
- Enter http://www.google.com/ and then tap on the Green check mark.
- Tap on OK.
- Tap on Options.
- Tap on Advanced settings.
- Tap on Proxy server address.
- Enter 216.155.165.050 and tap on the Green check mark.
- Tap on OK.
- Tap on Proxy port number.
- Enter 8080 and tap on the Green check mark.
- Tap on OK.
- Tap on Back until you reach the Main menu screen.
- Tap on the Internet icon.
- Tap on the Web icon.
- Tap on Options.
- Tap on Settings.
- Tap on General.
- Tap on Access point.
- Tap on Internet and tap on Options.
- Tap on Select access point.
- Highlight Simple Web and then tap on OK.
- Your manual internet will now be configured and set as default. MMS Setup
- Menu.
- Settings.
- Connectivity.
- Destinations.
- Multimedia msg.
- Options.
- New access point.
- Tap on No.
- Tap on Packet data.
- Tap on the Text field.
- MMS.
- Enter Simple and then tap on the Green check mark.
- Tap on OK.
- A new Access point is added.
- Highlight the new access point and then tap on Options.
- Tap on Edit.
- Tap on Access point name.
- Enter "simple" and tap on the Green check mark.
- Tap on OK.
- Tap on Homepage.
- Text field.
- Enter: http://smpl.mms.msg.eng.t-mobile.com/mms/wapenc
- Tap on OK.
- Tap on Options.
- Tap on Advanced settings.
- Tap on Proxy server address.
- Enter 216.155.165.050 and tap on the Green check mark.
- Tap on OK.
- Tap on Proxy port number.
- Enter 8080 and tap on the Green check mark.
- Tap on OK.
- Tap on Back until you reach the Main menu screen.
- Tap on the Messaging icon.
- Tap on Options.
- Tap on Settings.
- Tap on Multimedia Message..
- Tap on Access point.
- Tap on MMS.
- Tap on Simple OK.
HTC Dash (Windows Phone & Windows Mobile) - Internet Setup
Internet Setup
- Click on Start.
- Select Settings.
- Select Connections.
- Select GPRS (DELETE ALL T-MOBILE OPTIONS).
- Select New and enter the following information:
- Name: Simple
- Connect to: Internet
- Access point name: simple
- Username: Blank
- Password: Blank
- Primary dns: Blank
- Secondary dns: Blank
- IP address: Blank
- Press Done.
- Start.
- Internet Explorer.
- Menu.
- Tools.
- Options.
- Connections.
- "Automatically Detect Settings" should be Checked.
- Done.
HTC HD2 - Internet and MMS Setup
- Internet Setup
- From the home screen scroll to Settings.
- Select Wireless Controls.
- Select Menu on the bottom right.
- Select Connections.
- Select Advanced.
- Select "Select Networks".
- Select New.
- Enter "Simple Mobile" in the field.
- Select Modem.
- Select New.
- Enter "Simple Web" in the field - enter a name for the connection.
- Select "Cellular Line (GPRS)" in the field "Select a Modem".
- Enter "simple" in the field "Access point name".
- Leave User name/Password/Domain blank.
- You should now see a black dot in front of Simple Web. Select OK on the top right.
- Ensure "Simple Mobile" is selected for both drop down menus.
- Your internet is now configured. MMS Setup
- From the home screen select the "Messages" application.
- Select Menu in the bottom right.
- Select Settings.
- Select Options.
- Select Menu in the bottom right.
- Select MMS Server.
- Select New.
- Enter the following:
- Name: Simple MMS
- IP Address:
- Port number:
- Server Address: http://smpl.mms.msg.eng.t-mobile.com/mms/wapenc
- Connect via: Simple Web
- Message size limit: 1024 KB
- Select and hold down Simple MMS.
- SSelect Set as Default.
- There should be a green dot marked on the right of Simple MMS.
- Your MMS is now configured.
HTC G1 and G2
Internet Setup- Press the menu button (on front of phone).
- Tap Settings.
- Tap Wireless Controls.
- Tap Mobile Networks.
- Tap Access Point Names.
- Press the menu button.
- Select New APN.
- Enter the following details:
- Name: Simple
- APN: simple
- Proxy: 0.0.0.0
- Port:
- Username: [empty]
- Password: [empty]
- Server: [empty]
- MMSC: http://smpl.mms.msg.eng.t-mobile.com/mms/wapenc
- MMS Proxy: 0.0.0.0
- MMS Port:
- MCC: [empty]
- MNC: [empty]
- APN Type: not set
Google Nexus One
• Internet Setup
• Enter the following details:
◦ APN: Simple
◦ Proxy:
◦ Port:
◦ Username: not set
◦ Password: not set
◦ Server: not set
◦ MMSC: http://smpl.mms.msg.eng.t-mobile.com/mms/wapenc
◦ MMS Proxy:
◦ MMS port:
◦ MCC: 310
◦ MNC: 260
◦ Authentication type: none
◦ APN Type: not set
Page Designed by Jaffar
Any errors please Contract : 510-776-8295